Category: Automation

  • Google Forms to Google Sheets with Make: Filter Quote Requests

    Google Forms to Google Sheets with Make: Filter Quote Requests

    Practical automation · Hands-on guide

    Build a quote-request list with Google Forms, a filter in Make, and Google Sheets.

    For our fictional garden-care business, Make keeps quote requests out of the general-inquiry pile, cleans the email field, and adds accepted leads to a tracker. Follow the exact mapping and a three-response demonstration below.

    Fictional data only. Google sign-in was completed off camera.

    In this guide
    1. What you will build
    2. Before you begin
    3. Step 1 — Prepare the Google Form
    4. Step 2 — Prepare the lead tracker
    5. Step 3 — Create the Make scenario
    6. Step 4 — Configure Watch Responses and capture a sample
    7. Step 5 — Configure Add a Row and map the fields
    8. Step 6 — Add the Quote requests only filter
    9. Step 7 — Test three responses and verify two rows
    10. Step 8 — Activate and monitor when you are ready
    11. Understand credits before choosing a schedule
    12. Common errors and how to troubleshoot them
    13. Optional improvements beyond the recorded workflow
    14. Frequently asked questions
    15. Your next step

    What you will build

    The scenario polls for new responses, applies the quote-request filter, and writes one row for each accepted response.

    Workflow diagram, not a product screenshot. The filter belongs between the two modules; it is not a third app module.
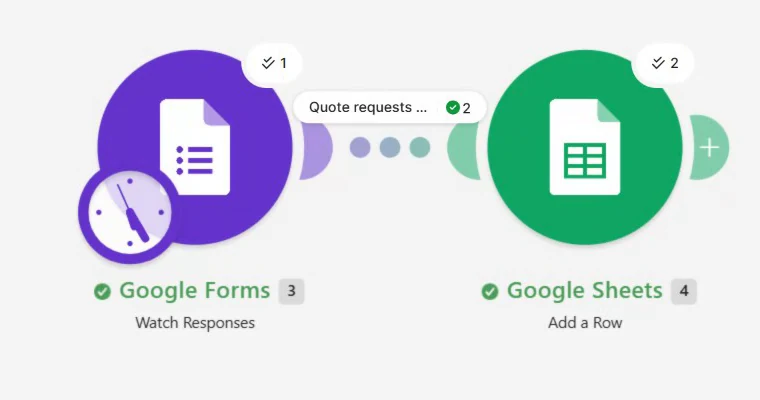
    Real Make canvas connecting Google Forms Watch Responses through Quote requests only to Google Sheets Add a Row
    The authentic demonstration scenario: two modules with a filter on their connection. Select the image for a larger view.

    Watch the real walkthrough

    Watch on YouTube if the embedded player is unavailable. The written steps below contain the full configuration.

    The Cedar Lane Garden Care demonstration produced two rows from three submissions and remained inactive afterward. This is a small manual test, not evidence of production reliability or duplicate prevention.

    Do you actually need Make?

    Use Google Forms’ built-in response destination to store every response. Use Make for this separate filtered list, email cleanup, and fixed Source and Status values.

    Before you begin

    • A Google account that can edit the demo form and write to the destination spreadsheet. Use a dedicated demo account while learning.
    • A Make account and enough available credits for a few manual tests. No paid-only module, AI service, or custom code is used.
    • A separate test form and spreadsheet containing fictional information only.
    • Access to Google’s authorization screens. Review the requested permissions yourself; file sharing and OAuth permissions are separate controls.

    You can create a Make account if needed. This is an affiliate link: Practiloom may earn a commission at no additional cost to you. For platform capabilities and plan comparisons, see our Make product overview.

    Make’s Sign in with Google connection is the normal starting point. Creating your own Google Cloud OAuth application is an advanced option, not a prerequisite for this exercise. A Workspace administrator may restrict third-party connections. See Make’s Google Forms connection documentation.

    Step 1 — Prepare the Google Form

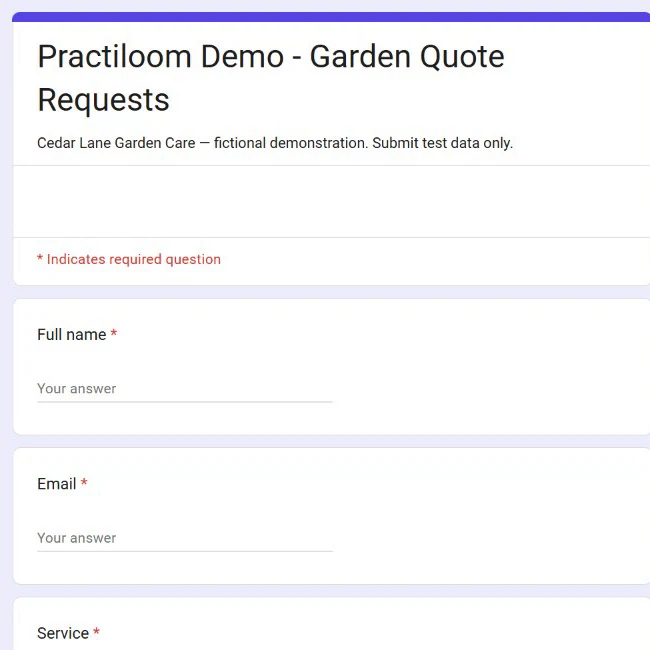
    Create a blank form called Practiloom Demo – Garden Quote Requests. Add the description “Cedar Lane Garden Care — fictional demonstration. Submit test data only.” Create these questions:

    On narrow screens, scroll this table horizontally. With a keyboard, focus the table area and use the Left and Right arrow keys.

    QuestionTypeRequired / options
    Full nameShort answerRequired
    EmailShort answerRequired; response validation: Text → Email
    ServiceMultiple choiceRequired: Lawn care; Garden cleanup
    Request typeMultiple choiceRequired: Quote request; General question
    MessageParagraphOptional
    Authentic Google Form with garden quote request title and required Full name and Email fields
    The responder view of the real demo form. Account details were hidden during the original capture. Select the image for a larger view.
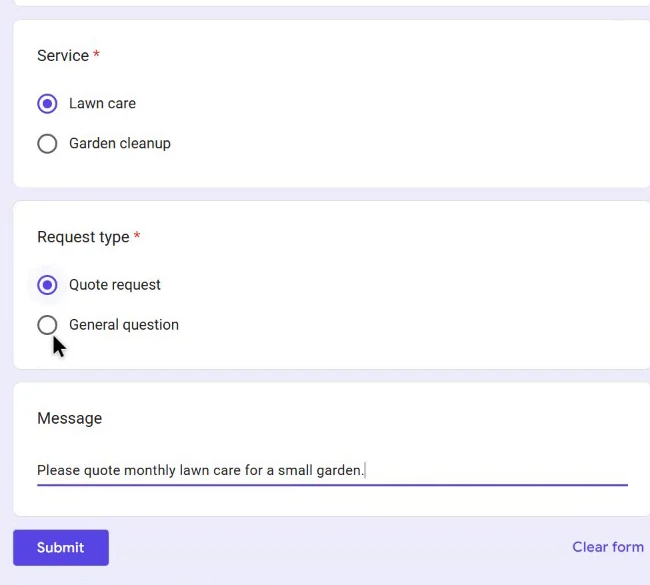
    Google Form showing Lawn care, Quote request, and a fictional garden message
    The lower part of the form supplies the service, request type, and optional message. Select the image for a larger view.

    For Email, open the question’s options menu and choose Response validation, then select the email text rule. Google explains the available rules in its form validation guide. Email format validation does not verify deliverability, identity, or permission to send marketing.

    When ready to test, use Publish and review responder access. Restrict the demo to your test account rather than distributing it publicly. Use the responder link for submissions and the editor link to find the Form ID. These links serve different purposes; the public responder identifier is not the editor Form ID. See Google’s publish and responder-access instructions.

    Step 2 — Prepare the lead tracker

    Create a spreadsheet named Practiloom Demo – Lead Tracker. Rename its first tab Leads, and put these headers in row 1, exactly in this order:

    A: Response ID    B: Submitted at    C: Name    D: Email
    E: Service        F: Message         G: Source  H: Status

    Keep this destination separate from any sheet that Google Forms creates for all responses. Otherwise, the built-in response link and Make could both write data you mistake for duplicates. Start with a blank tracker beneath the header row, and do not rearrange its columns after configuring positional mappings.

    If a different Google account owns the files, grant the account used by Make the necessary access to the two demo files. In our test, that account received Editor access to the form and spreadsheet. Responder access alone was not enough to configure this workflow. Do not make either file public to solve a permission error.

    Step 3 — Create the Make scenario

    Open Scenarios in Make and create a scenario named DEMO – Google Form Quote Leads. Add Google Forms → Watch Responses as the first module. Select the current response trigger, not the legacy Watch Responses in Google Sheets module.

    A module is an app action or trigger. A bundle is one set of data passed through the scenario; here, one form response becomes one bundle. Several bundles can come from one trigger check. Mapping tells a later module which values to take from an earlier module.

    Keep scheduling off during setup. Save the scenario as you complete each configuration. If you are new to this terminology, our first automation guide introduces the trigger-to-action pattern.

    Step 4 — Configure Watch Responses and capture a sample

    1. Open Watch Responses and create a Google connection. Sign in with the intended demo account and review the requested access. Connection names are only labels; verify which account you actually authorized.
    2. Find your editor URL: https://docs.google.com/forms/d/YOUR_FORM_ID/edit. Copy only the portion between /d/ and /edit into Form ID.
    3. Set Limit to 10, as in the demo. This is a response limit for a check, not a credit budget or a daily quota. The three-response demonstration does not test a backlog larger than Limit 10 or establish how quickly such a backlog would be drained.
    4. Save the module. When Make asks where to start, choose From now on before sending your new sample. If you need to revisit the choice, open the trigger’s context menu and its starting-point option.
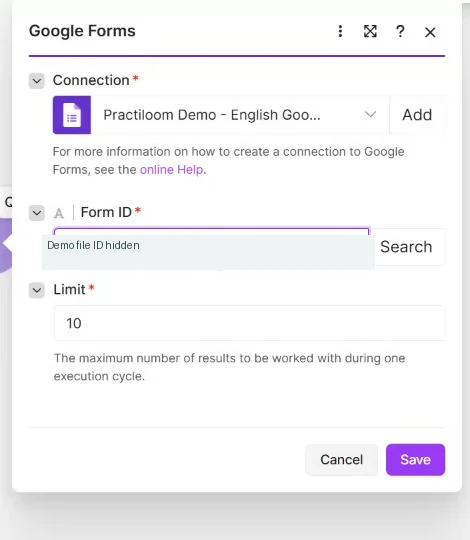
    Google Forms Watch Responses settings with redacted Form ID and Limit 10
    The captured trigger configuration. The demo file identifier has been concealed. Select the image for a larger view.

    Seed the mapper before building the destination

    With only the Forms module configured, submit a new response containing Demo Setup, setup@example.com, Lawn care, General question, and “Mapping sample only.” Then click Run once in Make. Because this trigger polls, submit first and run the check afterward.

    Open the output bubble above Forms. Expand answers, then the answer collection, then textAnswers → answers → value. Identify the relevant question by its known sample value. Also locate the top-level responseId and createTime.

    In our output, questions used generated IDs rather than friendly field names. Your IDs and module numbers will differ. The first item of the nested answer array is indexed as [1] in the recorded Make expressions. Do not choose an entire collection when a cell needs its text value. Make’s array-mapping guide explains these nested structures.

    This is a polling trigger, not an instant webhook. A form submission does not immediately push a row into Sheets; Make must perform its next scheduled or manual check. A linked Google response sheet is not required for this particular trigger.

    Step 5 — Configure Add a Row and map the fields

    Add Google Sheets → Add a Row after Forms. Authorize Google Sheets access if prompted, using an account able to write to your tracker. In the recorded setup, the search method was Enter manually.

    • Spreadsheet ID: take the ID from https://docs.google.com/spreadsheets/d/YOUR_SPREADSHEET_ID/edit. Do not paste the whole URL or the tab’s gid.
    • Sheet Name: Leads.
    • Column range: A–Z, the range offered by the captured interface. Populate A:H only and leave I:Z empty.
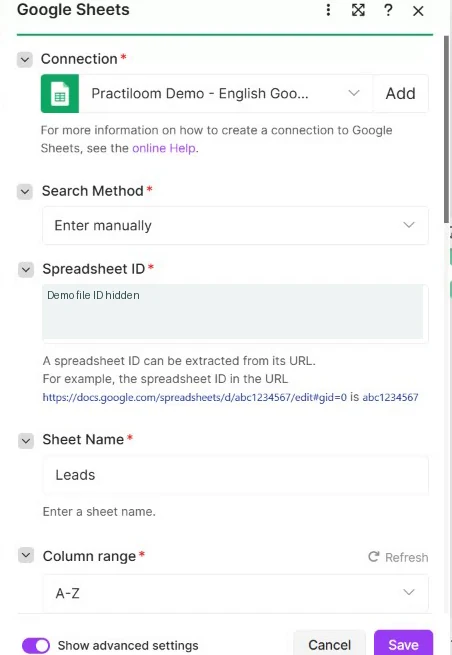
    Add a Row settings showing Enter manually, redacted spreadsheet identifier, Leads tab, and A–Z range
    Actual destination settings. The private demo spreadsheet identifier is hidden. Select the image for a larger view.

    The exact eight-column mapping

    The captured manual setup showed column letters. Match each letter to your header row. Other selection methods may display header names; do not assume that changes the order of your sheet.

    On narrow screens, scroll this table horizontally. With a keyboard, focus the table area and use the Left and Right arrow keys.

    Column / headerValue to mapPurpose
    A · Response IDForms responseIdTrace the originating response. Storing the ID does not automatically prevent duplicates.
    B · Submitted atformatDate(createTime; "YYYY-MM-DD HH:mm:ss"; "UTC")Submission time formatted explicitly in UTC.
    C · Nametrim(Full name answer value)Remove surrounding whitespace.
    D · Emaillower(trim(Email answer value))Remove surrounding whitespace and normalize case.
    E · ServiceService answer valueKeep the selected service text.
    F · MessageMessage answer valueKeep the optional message.
    G · SourceLiteral text: Google FormsIdentify where the lead originated.
    H · StatusLiteral text: NewGive each accepted lead a starting status.
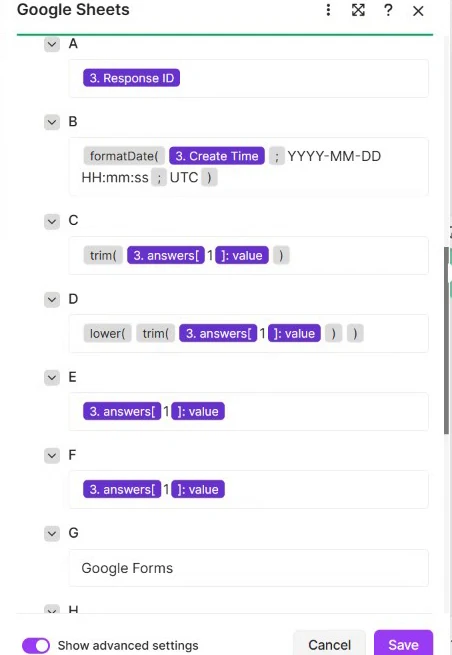
    Real Add a Row mapping panel showing response ID, UTC date formatting, trimmed name, and normalized email
    The mapper uses live output tokens from the Forms module. The table above is easier to read on small screens. Select the image for a larger view.

    Insert tokens from your own Forms output, then wrap them in the functions shown above. Use the Make function editor rather than typing a question label as literal text. See the official text function reference for trim and lower.

    Technical reference: expressions from the actual demo

    These are evidence of the demonstrated mapping, not a portable template. Module 3 and every question ID below belong to this form; replace them by selecting your own tokens.

    A {{3.responseId}}
    B {{formatDate(3.createTime; "YYYY-MM-DD HH:mm:ss"; "UTC")}}
    C {{trim(3.answers.0c302b8c.textAnswers.answers[1].value)}}
    D {{lower(trim(3.answers.47a46c2f.textAnswers.answers[1].value))}}
    E {{3.answers.514b6620.textAnswers.answers[1].value}}
    F {{3.answers.101867c8.textAnswers.answers[1].value}}
    G Google Forms
    H New

    Use the demonstrated write settings

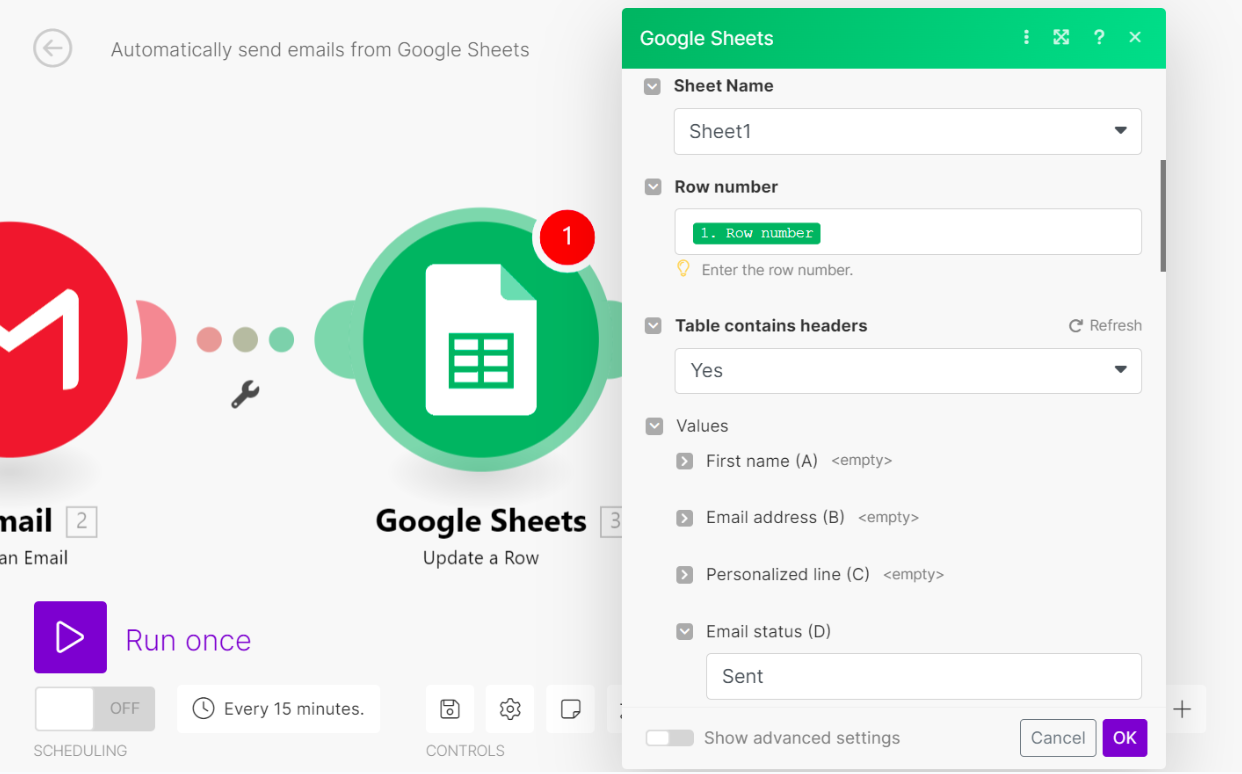
    In advanced settings, the demo used Unformatted: No, Value input option: Raw, and Insert data option: Insert rows. Raw avoids treating submitted strings as user-entered formulas or automatically parsed dates. The formatted UTC timestamp is therefore stored as text, not a native spreadsheet date value. If you later need date calculations, deliberately add and test a date-conversion strategy.
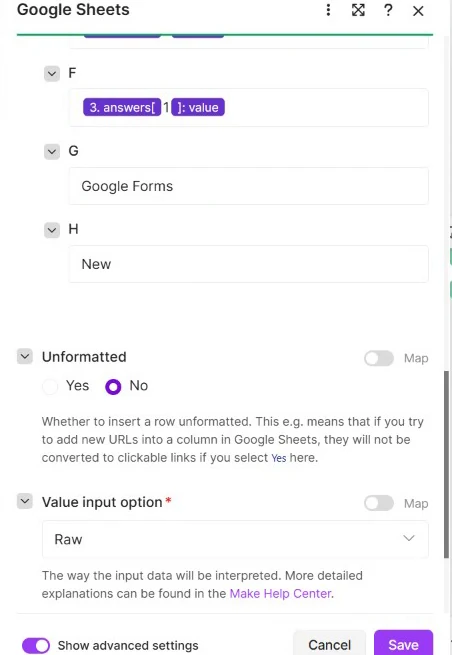
    Add a Row advanced settings with Source Google Forms, Status New, Unformatted No, and Raw value input
    The captured lower mapping and Raw input setting. Other unused column inputs were hidden in the recording presentation. Select the image for a larger view.

    Make’s Google Sheets module reference describes selection methods, header behavior, and write options. Save the module before adding the filter.

    Step 6 — Add the Quote requests only filter

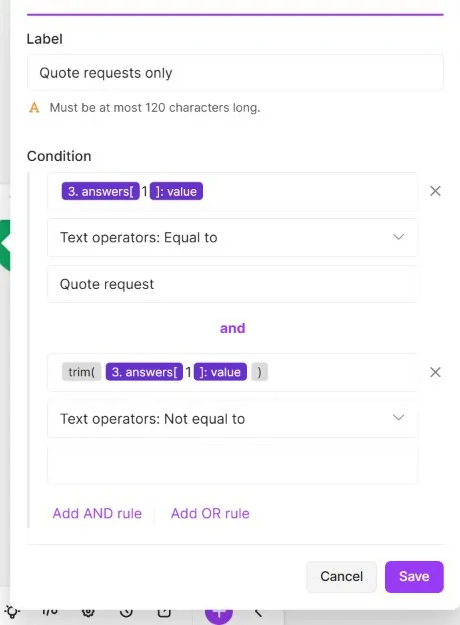
    Click the connection between Forms and Sheets, and open Set up a filter. Name it Quote requests only. Configure two conditions joined by AND:

    On narrow screens, scroll this table horizontally. With a keyboard, focus the table area and use the Left and Right arrow keys.

    Left operandOperatorRight operand
    The Request type answer valueText operators: Equal toQuote request
    trim(Email answer value)Text operators: Not equal toLeave the right-hand value empty
    Make filter named Quote requests only with Quote request equality and trimmed email not equal to empty, joined by AND
    The real two-condition filter runs before Add a Row. Select the image for a larger view.

    Select the same nested text answer values you identified in the seed output. In the actual demo, Request type was 3.answers.67571edb.textAnswers.answers[1].value. Your question ID will differ.

    The first condition excludes general questions. The second rejects an empty email after trimming. The empty-email condition was configured but was not exercised in the recorded test; the three submitted responses all contained email addresses. The required Form email question already provides a first guardrail; this filter is an additional check, not proof the email address exists. Both Lawn care and Garden cleanup can pass: service is not a qualifying condition here.

    Save the filter. Make’s filter documentation confirms that a bundle either continues to the next module or stops on that route. Rejected responses remain in Google Forms; this filter does not delete them.

    Step 7 — Test three responses and verify two rows

    Keep the scenario inactive. Submit these new fictional responses after the seed run. Use the responder form, not its editor.

    On narrow screens, scroll this table horizontally. With a keyboard, focus the table area and use the Left and Right arrow keys.

    Name / emailService / request typeMessage / expected result
    Jamie Rowan
    JAMIE.ROWAN@example.com
    Lawn care
    Quote request
    Please quote monthly lawn care for a small garden.
    Pass; email becomes lowercase.
    Taylor Morgan
    taylor.morgan@example.com
    Garden cleanup
    Quote request
    Please quote a one-time garden cleanup.
    Pass.
    Casey Ellis
    casey.ellis@example.com
    Lawn care
    General question
    What areas do you cover?
    Stop at filter.

    Now click Run once. Open the Forms output and inspect all three response bundles. Inspect the filter’s result and the Sheets output, then open the tracker itself. Do not judge success solely from a green module.
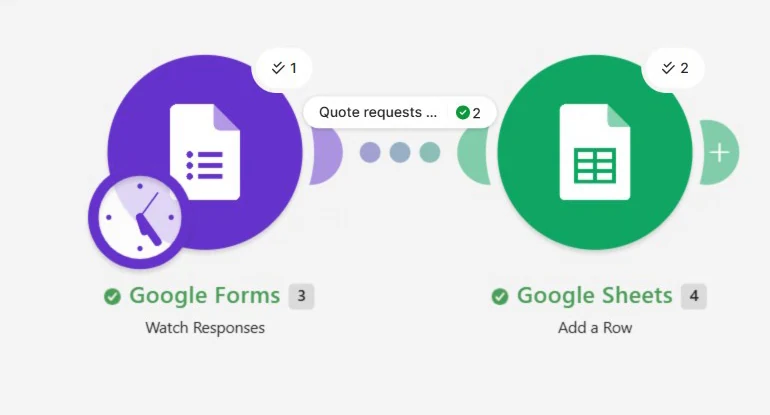
    Successful Make execution showing one Forms operation, two bundles passing the filter, and two Sheets operations
    The retained canvas frame shows one Forms operation and two Sheets operations. It does not display the trigger’s expanded three-response output. Select the image for a larger view.
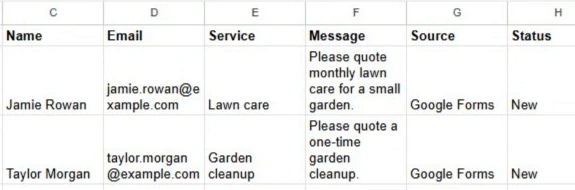
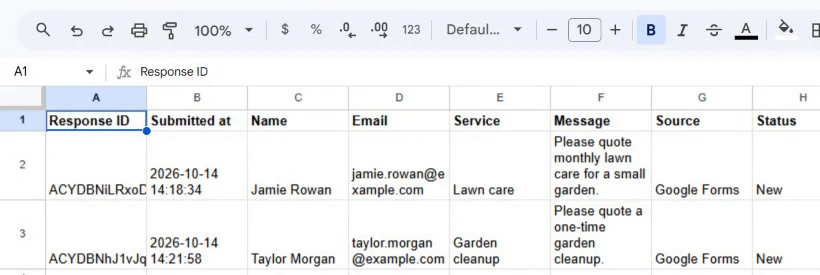
    Actual Leads spreadsheet containing Jamie Rowan and Taylor Morgan with Source Google Forms and Status New
    The destination contains two fictional quote leads. Jamie’s email is lowercase; Casey’s general question is absent. Select the image for a larger view.
    Native-pixel crop of Jamie and Taylor lead rows, including email, service, source and status
    Native-pixel detail from results.webm at 00:12.000. Only a crop and WebP encoding were applied; no upsampling or reconstructed text. It is a closer view of the same two rows, not independent execution evidence.

    Check all eight columns: response IDs present, UTC submission text present, names and services correct, Jamie’s email jamie.rowan@example.com, and both rows labeled Google Forms / New. Casey should not have a row.

    Evidence limit: no retained screenshot displaying all three expanded incoming response bundles was located in the supplied assets. The three recorded submission clips and the two destination rows support the documented test sequence; the canvas operation counter alone does not prove a three-bundle output. The recording did not test a backlog above Limit 10, an additional no-new-data run, deliberate retries, duplicate prevention, or an empty-email submission. Do not infer those tests succeeded. The demo also sent no emails and made no CRM changes.

    Step 8 — Activate and monitor when you are ready

    The recorded demo remains inactive. To operate your own scenario after testing, save it, open the scheduling control, choose a suitable interval, and activate it. Make’s scheduling guide explains this sequence. Manual Run once testing and recurring activation are different actions.

    Choose an interval based on acceptable lead delay and your allowance, not just the fastest option. After activation, submit one controlled test and inspect the next execution in History, the filter decisions, and the destination row. Check that the next scheduled run is expected. Review connection errors and credit usage regularly, especially after changing form questions or sheet columns.

    Turn scheduling off again for a learning scenario. Before handling real customers, agree on access, retention, follow-up ownership, error handling, and duplicate policy. This basic scenario is a starting point, not a complete customer-data system.

    Understand credits before choosing a schedule

    The test used ordinary non-AI modules. Make currently bills these at one credit per operation; polling checks can consume credits even when there is nothing new. See the official credit reference. The filter and inline text cleanup did not add separate app-module executions in our test.

    For a simple planning estimate, assume one credit per trigger check, plus one per accepted Add a Row operation. With uninterrupted polling over a 30-day month:

    On narrow screens, scroll this table horizontally. With a keyboard, focus the table area and use the Left and Right arrow keys.

    Polling intervalTrigger checks / dayTrigger-only estimate / 30 days
    Every 15 minutes962,880 credits
    Every hour24720 credits
    Once daily130 credits

    These calculations exclude accepted rows, setup tests, retries, extra modules, and other scenarios. At an hourly interval, 100 accepted leads would add roughly 100 row-write credits to 720 checks: about 820 for this simplified workload. It is a budget illustration, not a guarantee.

    Plan information checked: 15 October 2026. Make’s published Free plan includes 1,000 credits per month with a 15-minute minimum scheduled interval. That interval is a permitted minimum, not a promise that continuous 15-minute polling fits the allowance. This small manual exercise does not require a paid plan; sustained usage may outgrow Free. Verify the current plan before enabling scheduling.

    Common errors and how to troubleshoot them

    Work from left to right: source response, trigger output, filter decision, mapped input, then destination row. Change one thing at a time.

    On narrow screens, scroll this table horizontally. With a keyboard, focus the table area and use the Left and Right arrow keys.

    ProblemWhat to inspectPractical fix
    New response is missingWas it submitted after the starting point? Is the correct form selected? Was a poll actually run?Send a fresh response, then Run once. Check Limit and outputs before changing the cursor. Moving backward may replay earlier responses.
    Google permission errorWhich account authorized each connection? Can it edit the form and write to the sheet?Correct restricted file access or renew the relevant connection. Workspace restrictions may need an administrator. Never share credentials.
    No row in the expected sheetSpreadsheet ID versus tab gid; Sheet Name spelling; selected Google accountOpen the exact destination and verify Leads exists. Fix the module target; do not create a second tracker accidentally.
    Cells are blank or contain the wrong textWhether you mapped a text value, a whole collection, or a literal field labelInspect the known seed values in Forms output. Re-select tokens after deleting/recreating questions.
    Quote requests are blockedExact Request type answer, AND grouping, email token and empty right operandCompare an actual output bundle against both conditions. Check spelling and accidental spaces rather than removing the filter blindly.
    Duplicate rows appearReplayed cursor, copied scenarios, retries, manual reprocessing, or two writersStop recurring runs while diagnosing. Compare Response IDs. This demo has no duplicate guard; add an explicit lookup/idempotency design before relying on replay safety.
    The row did not appear instantlyScheduling off, next poll not yet due, or execution errorWatch History and the next scheduled time. Watch Responses is a polling trigger.
    Dates remain textRaw plus formatDate returns a formatted stringThis matches the demo. Plan a separate date conversion if native spreadsheet dates are required.

    Optional improvements beyond the recorded workflow

    • Duplicate prevention: look up Response ID before insertion or use an appropriately designed key store. A simple search-then-write can still race under concurrent execution; test your retry and concurrency strategy.
    • Notifications: add a team email or messaging action after successful insertion. Choose recipients deliberately and budget the extra executions. No notification was built in this demo.
    • Lead categorization: route services to the right person or add a separate category column. Start with deterministic rules; AI is unnecessary for the two service choices shown here.
    • CRM handoff: replace or supplement Sheets with a supported CRM action once you define ownership and duplicate rules.
    • Production safeguards: monitor failures, use appropriate error handling, test changed questions, and agree on retention for contact details.

    These are design ideas, not tested parts of the source video. Each extension needs its own permissions, verification, and credit estimate.

    Frequently asked questions

    Can Google Forms send responses to Sheets without Make?

    Yes. Forms can link all responses to a spreadsheet directly. Use Make when you want this separate filtered and normalized lead tracker or additional app actions.

    Is Google Forms Watch Responses instant?

    Not in this workflow. It polls when Make runs the scenario, either manually or on a schedule. Allow for that interval when setting response expectations.

    Do I need a paid Make plan?

    Not for a few manual tests with these modules and sufficient free credits. Continuous polling and additional actions can exceed Free, so calculate the ongoing allowance before activation.

    Why do my answer fields have different IDs?

    Google Forms assigns question IDs to your form, and Make module numbers depend on your scenario. Use your own sample output instead of copying the demonstration’s IDs.

    Does the filter delete rejected submissions?

    No. It prevents a bundle from reaching Add a Row on this route. The original submission stays in Forms.

    Does storing Response ID prevent duplicate rows?

    No. It gives you a key to investigate or build a duplicate check. The demonstrated Add a Row action does not implement that check.

    Can I use the form’s built-in email collection instead?

    You can design a form that way, but its response structure can differ. This demo uses a required short-answer Email question; inspect and remap your output if you change that design.

    Your next step

    You now have a concrete pattern: collect a response, inspect its actual fields, allow only quote requests through, and write a clean eight-column lead row. Reproduce the three-response test first. Once the output is right, choose a sustainable schedule and add only the safeguards your real process needs.

    For broader platform evaluation, continue with the Practiloom Make guide. For another beginner-friendly way to plan a useful workflow, read Your First Automation.

  • systeme.io Guide: Build Your First Free Sales Funnel

    systeme.io Guide: Build Your First Free Sales Funnel

    Want to build a landing page, collect subscribers and send a welcome email without stitching together several services? systeme.io combines those pieces in one online-business platform. This research-based walkthrough explains what it does, how to build a first funnel, and which limits to check before you pay.

    EDITORIAL DISCLOSURE

    This guide draws on official documentation, not independent hands-on testing. Practiloom may earn a commission from qualifying purchases through its referral link, at no additional cost to you.

    Explore the free plan ↗

    A sales funnel in three steps

    01 · ATTRACT

    Give visitors one focused landing page and one clear promise.

    02 · CAPTURE

    Connect a signup form to your contact list.

    03 · FOLLOW UP

    Send a useful welcome email or promised resource.

    ILLUSTRATIVE FUNNEL · NOT A PRODUCT SCREENSHOT
    Landing page
    →
    Signup
    →
    Welcome email
    Start with a simple opt-in journey before adding complexity.

    What does systeme.io actually do?

    systeme.io brings landing-page creation, email marketing, subscriber management, funnels and digital product delivery into one platform. It also offers tools for courses, affiliate programs and basic automation. The advantage for some creators is having fewer separate services to configure; the trade-off is dependence on one platform’s features and limits.

    What the real funnel editor looks like

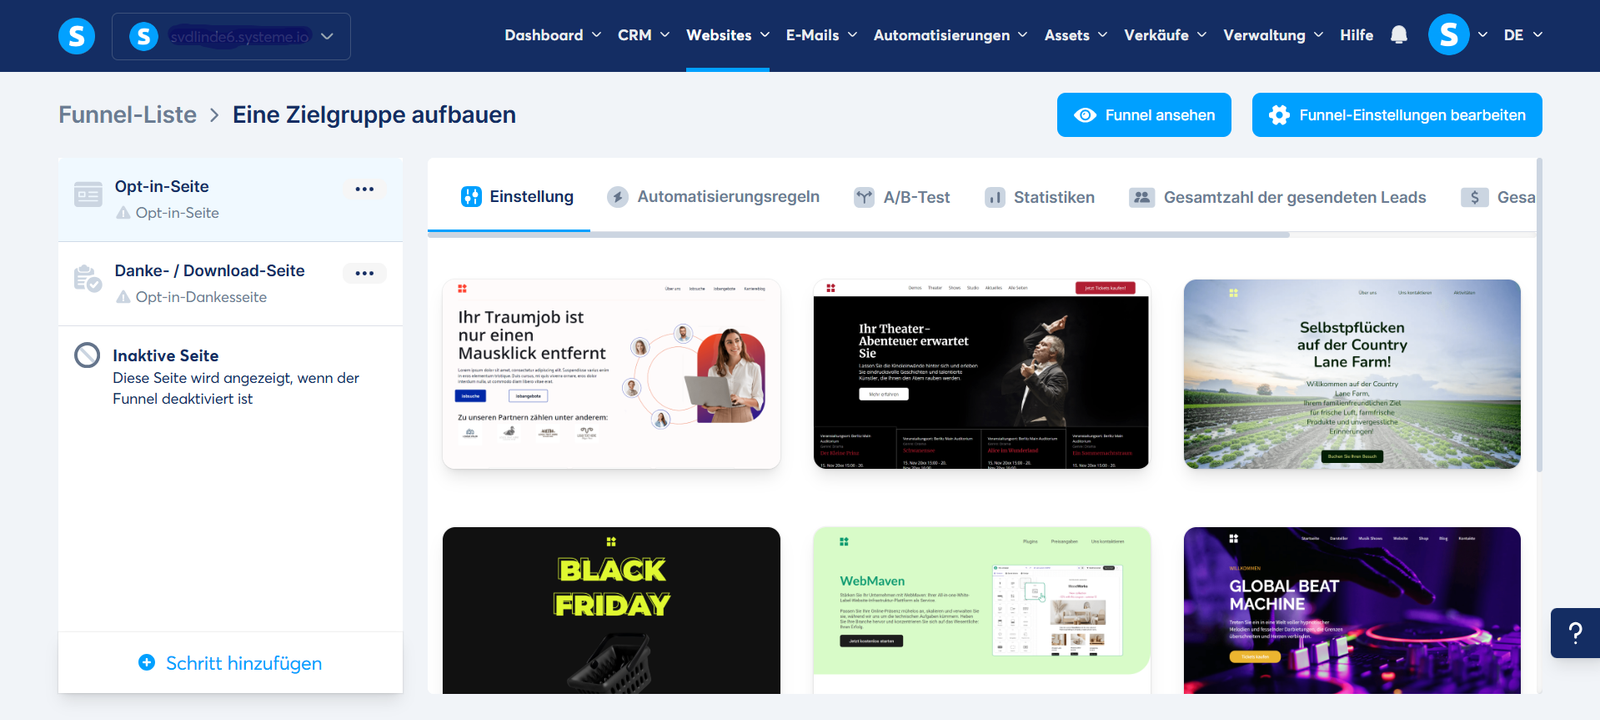
    systeme.io funnel editor shown in the official help center
    Actual systeme.io funnel interface, from official systeme.io help documentation (German-language example). Interface may change.

    Build your first funnel: a beginner walkthrough

    Use a fictional free checklist as your test offer. These steps are a suggested learning exercise, not a measured 15-minute test by Practiloom.

    Step 1 — Choose a single outcome

    Write a headline that promises one concrete benefit and explain what subscribers will receive.

    Step 2 — Create an opt-in funnel

    Open the funnels area, create a new funnel and choose a simple opt-in template.

    Step 3 — Edit your landing page

    Remove distracting sections, connect the signup form and check how the page displays on a phone.

    Step 4 — Add a follow-up rule

    According to the provider’s help documentation, the “Funnel step form subscribed” event can trigger a “Send email” action. Write a short email that delivers your promised item.

    Step 5 — Test the entire journey

    Submit your own test email address and confirm that contact creation, message delivery and mobile rendering work as expected.

    Step 6 — Review before scaling

    Only consider upgrading when a real use case reveals a feature, contact or automation limit.

    Can you get started for free?

    The provider advertises a permanent free plan with contact and feature limits. It has described a 2,000-contact cap, but limits for funnels, automation rules, workflows and email features can change. Confirm the conditions directly on the official pricing page before signing up.

    Your goalWhat to checkRecommended approach
    ExploreFree-tier features and capsBuild one dummy signup journey
    Grow subscribersContact and automation limitsUpgrade only when genuinely needed
    Sell a productPayments, refunds, taxes, deliveryTest purchase and fulfillment
    Switch laterExport, domains, account ownershipBudget for migration effort

    Who should consider systeme.io?

    Potentially useful for: solo creators testing digital products, small businesses building lead-capture pages, and people who want a landing page and email follow-up under one roof. Less suitable for: organizations requiring advanced CRM customization, complex cross-app automation or enterprise-specific controls.

    What to investigate before committing

    • Design flexibility for your brand and landing-page needs.
    • Whether required integrations are supported.
    • Contact caps and feature restrictions as your audience grows.
    • Data export and switching costs.
    • Checkout support, local payment availability and compliance obligations.

    Alternatives worth comparing

    A dedicated newsletter service might be enough if all you need is email. WordPress plus focused form and email tools may offer more customization. For complex cross-app processes, Make is a different kind of product. Read Make vs systeme.io to compare their roles.

    Common questions

    Is systeme.io really free?

    The provider offers a permanent free tier subject to limits. Check the current terms before joining.

    Do I need to code?

    Its funnels and pages use visual editing. Advanced integrations may still need technical work.

    Can I send emails after a form signup?

    The provider documents signup-based email automation actions. Test them before going live.

    Should I upgrade immediately?

    Not until you have tested a real use case and identified a specific limit.

    Did Practiloom test deliverability?

    No. This is an editorial guide based on documented capabilities, not an independent benchmark.

  • Make Automation Guide (2026): Build Your First Workflow

    Make Automation Guide (2026): Build Your First Workflow

    Looking for features, plans and suitability? Read our Make product overview. This page focuses on getting started with automation.

    Make connects apps through visual scenarios. This guide covers everyday workflow examples, your first beginner scenario, credit limits, pricing and when to choose another solution.

    Independent research based on official documentation, not a hands-on performance test. Some links are affiliate links and may earn Practiloom a commission at no additional cost to you.

    Explore Make’s free plan ↗

    01 / WHAT IT DOES

    Make is the glue between
    your everyday tools.

    A Make scenario is a workflow that moves information between applications. Instead of copying the same details from a form into a spreadsheet and sending a notification manually, you can describe the steps once and let the scenario handle them.

    01 / TRIGGER

    Something happens

    A new form response arrives, a spreadsheet row is created, or a webhook receives data.

    02 / TRANSFORM

    Data gets organized

    Map fields, apply conditions, format values or branch into separate routes.

    03 / ACTION

    The next step runs

    Create a record, send a message, update a database or pass information to another app.

    REALISTIC EXAMPLE / LEAD CAPTURE

    Stop copying every new lead by hand.

    Imagine someone fills out a lead form. Your workflow creates a row in a shared spreadsheet, then alerts the appropriate person. If you later add conditions, only leads matching your criteria receive certain notifications.

    This is a proposed workflow, not an independently tested template. Actual app connections, permissions and available modules vary.

    Illustration designed for learning. No live customer information is displayed.

    02 / THE CAPABILITIES

    Simple enough to start.
    Powerful enough to grow.

    The important question is not how many integrations exist, but whether the specific apps and actions your process needs are supported.

    Visual scenario builder

    Connect modules in a visual canvas and see the order in which data moves through a workflow.

    Routers and filters

    Split one process into different paths and allow only matching records through a branch. Routers themselves do not consume credits.

    Webhooks and schedules

    Start workflows when an external event arrives or check for changes on a schedule. Scheduling frequency depends on your plan.

    Error handling and history

    Inspect executions and configure responses to failed steps, rather than assuming every automation will run flawlessly.

    AI-assisted workflows

    Connect supported AI services for tasks such as classification or text processing. AI features may have separate credit requirements and provider costs.

    Reusable building blocks

    Start with an official template or a tiny two-module scenario, then add logic only when a real need appears.

    03 / THE FIRST PRACTICAL PROJECT

    Build your first scenario,
    one step at a time.

    Use the official beginner course alongside this checklist. Make Academy’s free “Setting up my first scenario” course is designed for newcomers and estimates 60–90 minutes. The exercise below is a simplified learning plan, not a measured test by Practiloom.

    1. Pick a small task with a clear result

    For practice, choose a safe workflow such as reading data from one supported app and creating a row in a test spreadsheet. Avoid real customer data and financial actions while learning.

    2. Create a scenario and choose the trigger

    Inside Make, create a new scenario. Search for your source app and select the relevant trigger module. A trigger determines when the process starts, whether by polling or an instant event.

    3. Connect the source account

    Authorize only the access required for the test. Check the permissions requested by the integration and confirm you’re using the intended account.

    4. Add a second module

    Choose the destination app and action. For example, map an incoming name and timestamp into spreadsheet columns. In Make, mapping is how data from earlier modules is passed to later ones.

    5. Run once and inspect the output

    Use the scenario’s test run to inspect what each module received and returned. If the destination record is wrong, fix the field mapping before enabling repeated runs.

    6. Set a schedule—or use an instant trigger

    For scheduled scenarios, the Free plan has a minimum 15-minute interval. Instant webhooks can react when a supported external event arrives; they follow different execution behavior.

    7. Add guardrails before real use

    Think about duplicates, missing fields, API rate limits, failed connections and whether an error could create an unwanted action. Use filters, error handling and execution history as appropriate.

    Beginner shortcut: Learn with a two-module workflow first. Only add routers, AI, multiple branches or paid features when the basic path runs correctly. This also makes credit consumption easier to understand.

    The first link is an affiliate link. Make Academy is a non-affiliate educational resource.

    04 / PRICING WITHOUT THE GUESSWORK

    What does Make really cost?

    Make charges by credits. Most module actions use one credit, but certain advanced features may use more. A scenario that processes many records can consume many credits in a single run. Pricing below reflects the provider’s published pricing page checked in October 2026; verify it before purchasing.

    PlanListed monthly price*Best starting pointImportant detail
    Free$0Learning and small workflows1,000 credits/month, 2 active scenarios, 15-minute minimum schedule interval
    Core$12Regular workflowsPrice shown for 10,000 credits/month; unlimited active scenarios and faster scheduling
    Pro$21Advanced individual users10,000-credit reference tier; adds priority execution and advanced management features
    Teams$38Collaborating teams10,000-credit reference tier; team roles and shared templates
    EnterpriseCustom quoteComplex organizationsAdditional governance, security and support options

    *Indicative provider-listed USD monthly figures for the 10,000-credit selection where applicable; billing frequency, region, taxes, selected credit volume and promotions can change the actual price. Source: official Make pricing.

    A simple credit calculation

    Suppose a scenario performs three billable module actions per successful run and runs 100 times in a month. That is roughly 300 credits before extra searches, retries, iterators or other billable actions. This is an illustrative calculation, not a guaranteed invoice. Check the execution log and credit meter to measure your own workflow.

    When should you upgrade?

    Not on day one. First establish a reliable workflow, track how often it runs and compare your actual usage against the Free plan’s credit and scheduling limits. Upgrade only when a specific constraint prevents the process from working as needed.

    05 / THE TRADE-OFFS

    Who should use Make?
    Who probably shouldn’t?

    STRONG FIT

    Solo operators

    People moving data between several apps, updating spreadsheets or coordinating repetitive steps.

    STRONG FIT

    Small teams

    Teams handling leads, alerts, reporting and repeatable multi-app processes that need visibility.

    CONSIDER ALTERNATIVES

    Single-app tasks

    If one app already provides a reliable native automation, an extra integration platform may add complexity.

    Where Make is compelling

    • A visual builder makes the logic of a workflow easier to inspect than a hidden sequence of scripts.
    • Routers, filters, scheduling and webhooks support more than simple one-step connections.
    • The permanent free tier offers a low-commitment way to learn.
    • Official Academy lessons, help documentation and templates reduce the need to learn from scattered tutorials.

    Where you need to be careful

    • Credits can grow faster than expected when processing multiple records or retrying failures.
    • Connections depend on external APIs, app permissions and service availability.
    • Multi-branch scenarios can become difficult to debug without clear naming and documentation.
    • Automation of sensitive information requires deliberate access control and data-handling choices.

    These are practical evaluation considerations grounded in platform behavior and documentation, not claims from an independent performance benchmark.

    Editorial verdict: Make is a strong candidate when your problem is moving information between multiple applications. If your main goal is a landing page, an email list and a basic sales funnel, an all-in-one marketing platform may be more straightforward.

    Make vs systeme.io: not the same category

    Make is a cross-app automation platform. systeme.io is an online-business platform focused on funnels, email and selling digital offers. They can complement each other, but choosing between them depends on the job you’re trying to accomplish. Read the side-by-side comparison →

    06 / QUESTIONS BEFORE YOU SIGN UP

    Frequently asked questions.

    Is Make free forever?

    The provider advertises a Free plan with no time limit. It has limits, including 1,000 monthly credits and two active scenarios, so verify current conditions on the pricing page.

    Do I need to know how to code?

    No. The visual builder is designed for no-code workflows. Advanced integrations, APIs and data transformations can still benefit from technical knowledge.

    What is a scenario?

    A scenario is a connected workflow of modules that takes information from one app or event and performs actions in another.

    What happens when credits run out?

    According to Make’s pricing FAQ, scenarios stop running until credits are added or the allowance renews; incoming webhook events may queue within applicable limits.

    Are Make and Zapier the same?

    They are both automation platforms, but differ in interfaces, pricing models, integrations and workflow design. Compare the specific workflow you need rather than assuming one is universally cheaper or better.

    Can I use Make with AI tools?

    Yes, Make supports AI-related apps and features. Available modules, provider fees and credit consumption depend on the integration and plan.

    Did Practiloom personally test Make?

    This page is an editorial research guide based on official documentation, not a hands-on benchmark. We distinguish illustrative examples from verified product specifications.

    07 / LEARN FROM THE SOURCE

    Free resources worth bookmarking.

    OFFICIAL / FREE TRAINING

    Make Academy

    Structured lessons for beginners, including scenarios, app connections and mapping.

    Start the beginner course ↗
    OFFICIAL / STARTER IDEAS

    Template gallery

    Explore existing automation patterns and adapt a relevant template to your own apps.

    Browse templates ↗
    OFFICIAL / TROUBLESHOOTING

    Help Center

    Read about webhooks, routers, scheduling, error handling and scenario settings.

    Open documentation ↗

    Source review: official Make pricing, Make Academy, and Make Help Center, October 2026. Product details may change after publication.

    START SMALL / LEARN BY DOING

    Automate one task.
    Then build on what works.

    Don’t start with a complicated AI agent. Start with a trigger, one useful action and a test you can verify. Make’s free plan gives you room to explore before deciding whether a paid tier is justified.

    Affiliate disclosure: if you purchase through the referral link, Practiloom may receive a commission at no additional cost to you. Provider terms determine eligibility.

  • Your First Automation: A Practical Beginner’s Guide

    Your First Automation: A Practical Beginner’s Guide

    New to automation? Your first workflow should be simple, low-risk and easy to test. This guide walks you through one practical example so you can build with confidence instead of adding unnecessary complexity.

    AT A GLANCE · YOUR FIRST AUTOMATION
    01 · CHOOSE

    Find one recurring task

    02 · CONNECT

    One trigger → one action

    03 · REVIEW

    Test, monitor, improve

    Your first workflow: a real example

    Imagine you receive customer inquiries through a contact form. Instead of copying details manually into a spreadsheet, you can create one straightforward workflow: each new submission becomes a new row, then a person checks the result.

    ILLUSTRATIVE WORKFLOW · NOT A PRODUCT SCREENSHOT
    ✉
    Form received
    Trigger
    →
    ▦
    Record created
    Action
    →
    ✓
    Human review
    Checkpoint
    A repeatable task becomes a small, reviewable workflow.

    Step 1 — Pick a low-risk process

    Good candidates include logging a new form response, sending a routine internal reminder or organizing incoming files. Avoid payments, irreversible changes and sensitive personal data at first. Choose a process that already works manually.

    Good first automation: Save a contact form submission in a spreadsheet, then notify your team. You can check the result without giving the automation control over important decisions.

    Step 2 — Map the manual process

    Write down what starts the process, what information is required, what actions follow and how to recognize success. For the contact-form example, you need to know which fields are required, where the record should go and how to handle incomplete submissions.

    Step 3 — Build the smallest useful version

    Start with one trigger and one action. Test with realistic examples, including missing fields and duplicate submissions. If your first automation needs a complicated diagram, you may be trying to solve too much at once.

    What a visual automation builder looks like

    Official Make scenario editor screenshot demonstrating a visual automation interface
    Make scenario editor · Image from Make’s official tutorial. This is a product reference, not a Practiloom hands-on test.

    Visual builders such as Make can connect apps through steps and triggers. You do not need to use a specific platform to understand the workflow principles in this guide.

    Step 4 — Keep a human checkpoint

    When a workflow has meaningful consequences, let it prepare a draft or notification for approval rather than acting automatically. Review checkpoints are especially valuable while you are learning and still discovering edge cases.

    Common mistake: Switching on a fully automated process before testing duplicates, missing information and error handling. Start with a draft or notification and approve the next action yourself.

    Step 5 — Review results

    After a week, measure time saved, check errors and decide whether expanding the automation is justified. An automation is valuable only if it reduces effort without creating extra cleanup work.

    ComponentExampleWhat to check
    TriggerNew form submissionRequired fields
    ActionCreate tracking recordDuplicates and field mapping
    ReviewNotify a personError visibility and approval

    A practical five-step checklist

    • Choose a repetitive, low-risk task.
    • Write down the trigger, input and expected action.
    • Build a minimal version.
    • Test edge cases and retain a human checkpoint.
    • Review the results before expanding.

    Ready for a platform-specific walkthrough? Explore our Make automation guide, or browse the tool library to compare available solutions.